
Introduction#
Your computer’s startup programs can significantly impact its performance and boot time. Sometimes, you might want to remove unnecessary or unwanted startup programs to optimize your system. While there are user-friendly methods to manage startup programs, using the Windows Registry Editor, or Regedit, provides a more advanced and granular level of control, and without using 3rd program. In this guide, we’ll walk you through the process of using Regedit to delete startup programs from your Windows PC.
What Is Regedit?#
The Windows Registry is a hierarchical database that stores configuration settings and options on Microsoft Windows operating systems. Regedit is the built-in registry editor that allows users to view, edit, and manipulate this database. It’s a powerful tool often used by advanced users and IT professionals to make changes to the Windows operating system and installed applications.
Why Remove Startup Programs?#
Startup programs are applications or scripts that launch automatically when your computer boots up. While some of these programs are essential for system functionality, others can slow down your PC’s startup and overall performance. Here are some reasons why you might want to remove startup programs:
Improved Boot Time: Fewer startup programs mean a faster boot time, allowing you to start using your computer more quickly.
Resource Efficiency: Unnecessary startup programs consume system resources like CPU and memory, potentially causing slowdowns.
Reduced Clutter: A cluttered startup can make it difficult to find and focus on the programs you need.
Now, let’s dive into the steps for using Regedit to delete startup programs.
Deleting Startup Programs with Regedit:#
Note: Editing the Windows Registry can have unintended consequences if not done correctly. It’s essential to follow these steps carefully and make a backup of your registry before making any changes.
Open Regedit: Press
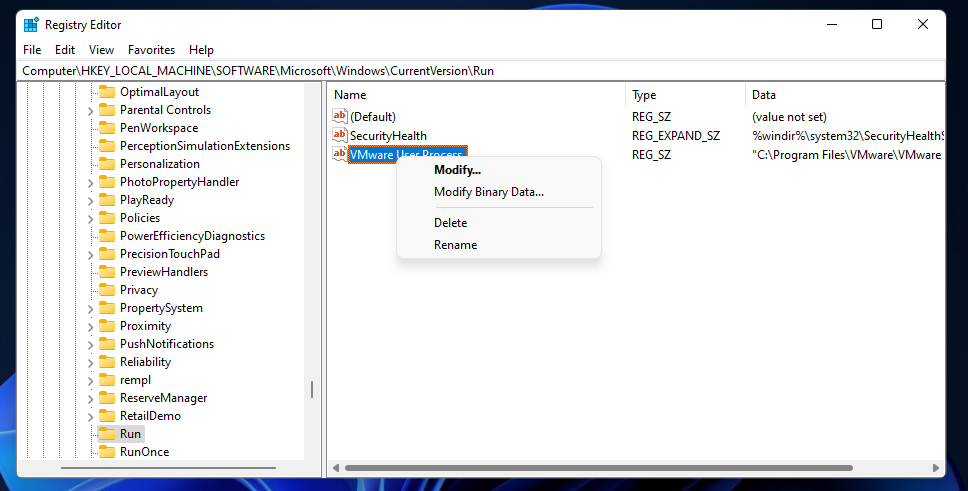
Win + Rto open the Run dialog, typeregedit, and press Enter. This will open the Registry Editor.Navigate to the Startup Key: In the left-hand pane of the Registry Editor, navigate to the following key:
Computer\HKEY_LOCAL_MACHINE\SOFTWARE\Microsoft\Windows\CurrentVersion\RunThis key contains entries for startup programs that apply to all users of the computer.
Identify the Program: In the right-hand pane, you’ll see a list of entries. Each entry represents a startup program. To identify the program you want to delete, look at the “Data” column, which contains the file path or command for the program.
Delete the Entry: Right-click on the entry you want to remove and select “Delete.” Confirm the deletion if prompted.
Repeat as Needed: If you want to remove multiple startup programs, repeat steps 3 and 4 for each one.
Close Regedit: Once you’ve deleted the desired entries, close the Registry Editor.
Restart Your Computer: To apply the changes, restart your computer.
Verifying Changes:#
After restarting your computer, the deleted startup programs should no longer launch automatically. You can verify this by checking the Task Manager’s Startup tab or using a third-party startup manager tool. If you encounter any issues or unintended consequences, you can use the backup of your registry to restore the deleted entries.
Conclusion:#
Using Regedit to delete startup programs gives you precise control over your computer’s boot process and resource usage. However, it’s essential to exercise caution when editing the Windows Registry, as incorrect changes can lead to system instability. With this guide, you now have the knowledge to manage your PC’s startup programs effectively and optimize its performance.